US English (US)
FR French
DE German
ES Spanish
IT Italian
NL Dutch
menu

Contact Us

No results found. Still need help? Contact us

  • Scheduled Assistance
  • Contact Us
English (US)
US English (US)
FR French
DE German
ES Spanish
IT Italian
NL Dutch
arrow_back
  • Getting Started
  • Devices
  • App
  • Portal
  • Admin Settings
  • Accessories
  • Labels
  • Repairs
  • APIs
  • Task Manager
  • RightBytes
  • Scheduled Assistance
  • Contact Us

Manage Product in StockSmart

Contact Us

If you still have questions or prefer to get help directly from an agent, please submit a request.
We’ll get back to you as soon as possible.

  • Getting Started
    Getting Started Guides Set Up Training
  • Devices
    Troubleshooting Device Overview 2.0 Model X Series Model Fit Model Lite Model mC-Label3 Printer CL-S700III Printer Device Tablet Internet Connection Warranty & Support
  • App
    Error Codes Troubleshooting App Overview Mobile App Subscription Prep Lists Product Control Rosters Scale Temperature Probe Print History Settings Language Location Overrides
  • Portal
    Portal Overview Locations Categories Menu Items Printer Profiles Users Settings Quick Labels Prep List Print History Mass Import and Export Media Library Location Overrides Product Control Rosters Scale Temperature Probe Groups Support
  • Admin Settings
    Start with Admin Settings Admin Settings Overview Locations Devices and Licenses Permission Roles
  • Accessories
    Bluetooth Scanner USB Scanner Temperature Probe Scale Label Rewinder Fit Printer Shelf Warranty
  • Labels
    Overview Troubleshooting
  • Repairs
    2.0 Model X Series Model Lite Model DateCodeGenie® Tablet
  • APIs
    Inbound APIs Outbound APIs
  • Task Manager
    Task Manager Overview Venues Forms Approvals Users Resources Task Manager App Task Manager Hardware Troubleshooting
  • RightBytes
    InsightsLite StockSmart
+ More
  • Home
  • RightBytes
  • StockSmart
  • Inventory

Table of Contents

Add Product TIPS & TRICKS Set up product breakdown Edit Product Delete Product

Manage individual products in StockSmart under the Inventory tab.

Add Product

TIPS & TRICKS

You can add a large volume of products at once using two different methods:

  1. With a supplier connection using the initial product import, see Initial Product Import in StockSmart.
  2. Using manual order creation to import spreadsheet of products.
 

1. Go to https://stocksmart.rightbytes.com/login and log in.

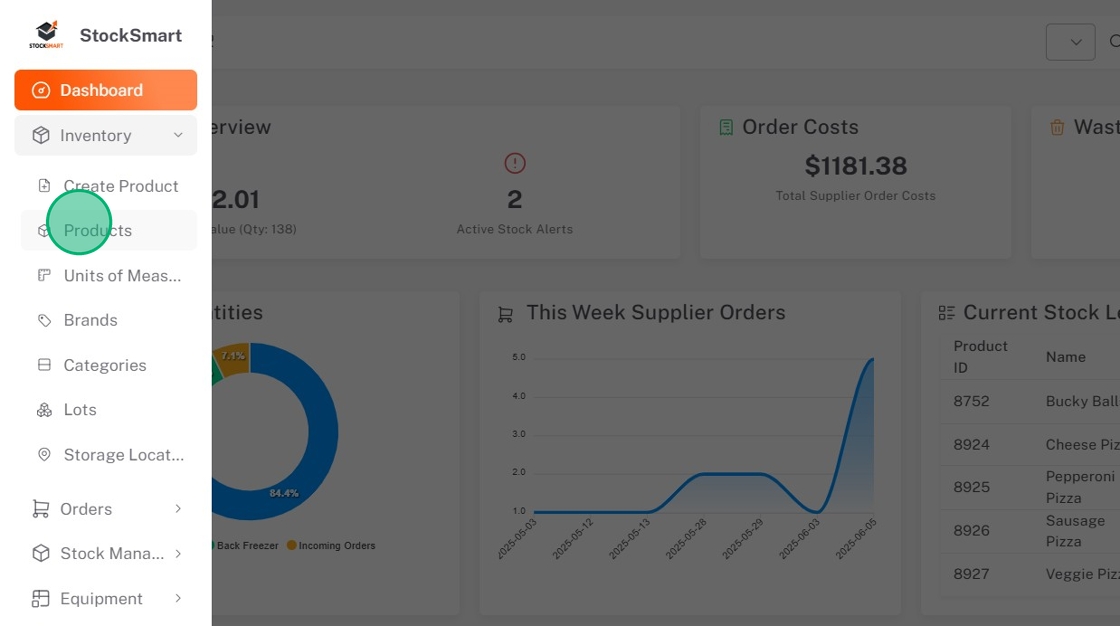
2. Click the menu button (three-line icon).

3. Click Inventory, then Create Product.

4. Complete required and optional fields.

a. Type the Name of the product.

b. Type the Product Cost.

c. Select the Category from the dropdown.

d. Select the Brand from the dropdown.

e. Select the units the product comes in from the Product Original Units dropdown.

f. Type the UPC/Barcode. If there isn't one, click Generate UPC.

g. OPTIONAL: Upload a Product Image to visually identify a product.

h. OPTIONAL: Type the Product Code if there is another code used.

i. OPTIONAL: Set up a Stock Alert. Type the inventory level that you want to be alerted at.

j. OPTIONAL: Set up a Build To alert, for the minimum stock amount you want to have on hand.

k. OPTIONAL: Select the Default Storage Location to automatically sort incoming orders to their typical storage location.

l. OPTIONAL: Check Exclude Inventory Calculations if this product should not be included in stock valuations.

m. OPTIONAL: Check Breakdown Needed to break down the product into smaller units automatically after receiving an order.

Set up product breakdown

i. Select the Breakdown Unit from the dropdown.


ii. Type the Breakdown Quantity.


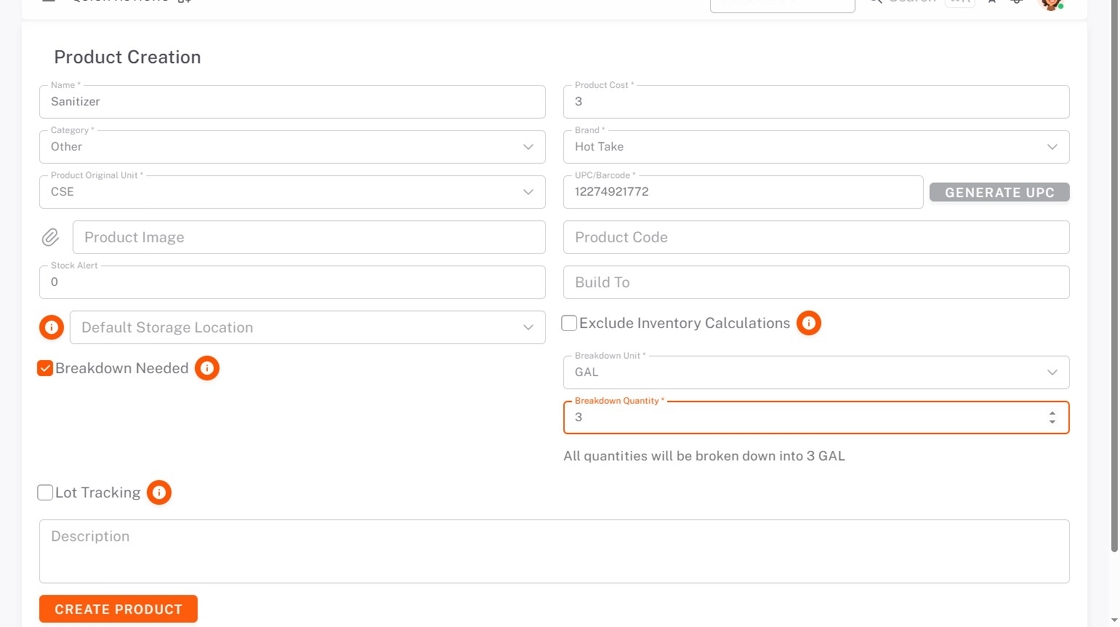
n. OPTIONAL: Check Lot Tracking to set up tracking.

o. OPTIONAL: Type a Description of the product.

5. Click Create Product.

6. The product quantity will be set to zero. To add an initial product quantity, you can adjust stock levels in the Stock Management tab, see Adjust Stock Levels in StockSmart.


Edit Product

1.  Click the menu button (three-line icon).

2. Click Inventory, then Products.

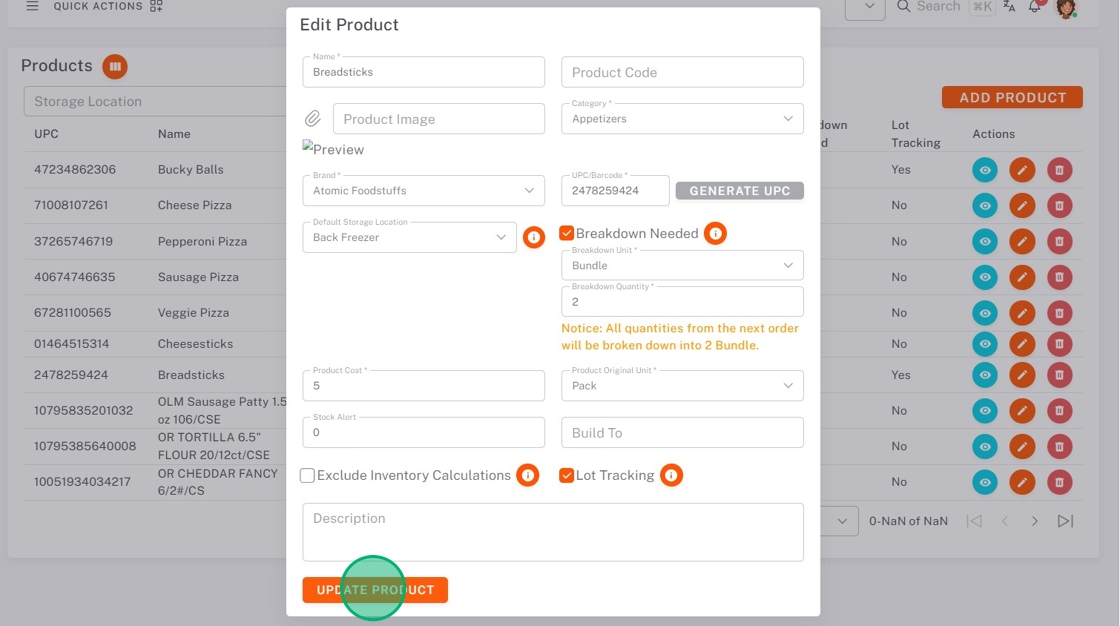
3. Click the Edit button (pencil icon) next to the product.

4. Make edits, then click Update Product.


Delete Product

1. Click the delete button (trash icon) next to the product.

2. Click Delete to confirm.


Related Articles

  • Manage Storage Locations in StockSmart
  • Manage Brands in StockSmart
  • Manage Categories in StockSmart
  • Manage Units of Measure in StockSmart

Was this article helpful?

Yes
No
Give feedback about this article

Related Articles

  • Manage Storage Locations in StockSmart
  • Manage Brands in StockSmart
  • Manage Categories in StockSmart
  • Manage Units of Measure in StockSmart
© 2025 DateCodeGenie

899 Montreal Circle, St. Paul, MN 55102

Privacy Policy

contact us
About NCCO

Knowledge Base Software powered by Helpjuice

Expand