Las etiquetas no se cortan correctamente
Las etiquetas avanzan a través de la impresora del dispositivo, pero no se cortan correctamente y es posible que se impriman una o varias etiquetas.
Solución de problemas de etiquetas que no cortan correctamente
Seleccione modelo o impresora:
Verifique que la línea negra en el reverso de las etiquetas sea sólida y no esté descolorida. Consulte las etiquetas DateCodeGenie como referencia.
Si la línea negra es incorrecta, reemplácela con un rollo de etiquetas con la línea negra correcta e intente imprimir nuevamente.
Imprima una prueba de impresión
Prueba de autoimpresión para dispositivo 2.0 y modelo de ajuste
Modelo descontinuado.
DateCodeGenie utiliza una impresora térmica para imprimir etiquetas. Para imprimir y cortar las etiquetas correctamente, la impresora DateCodeGenie lee la línea negra en el reverso de la etiqueta.
Imprimir una autoprueba puede ayudar a determinar si la impresora no está cortando o avanzando las etiquetas correctamente.
Pasos:
1. Verifique que las etiquetas estén insertadas correctamente en la impresora, consulte Cómo cargar etiquetas en los dispositivos del modelo 2.0 y Fit .
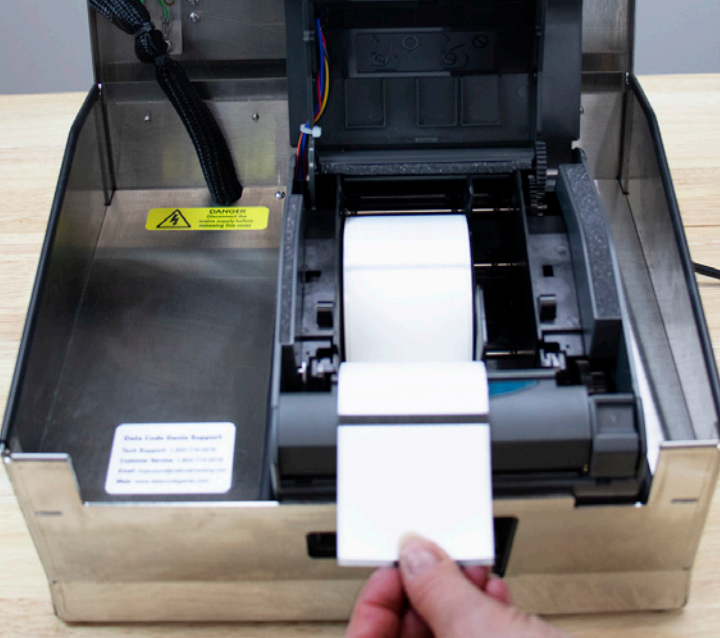
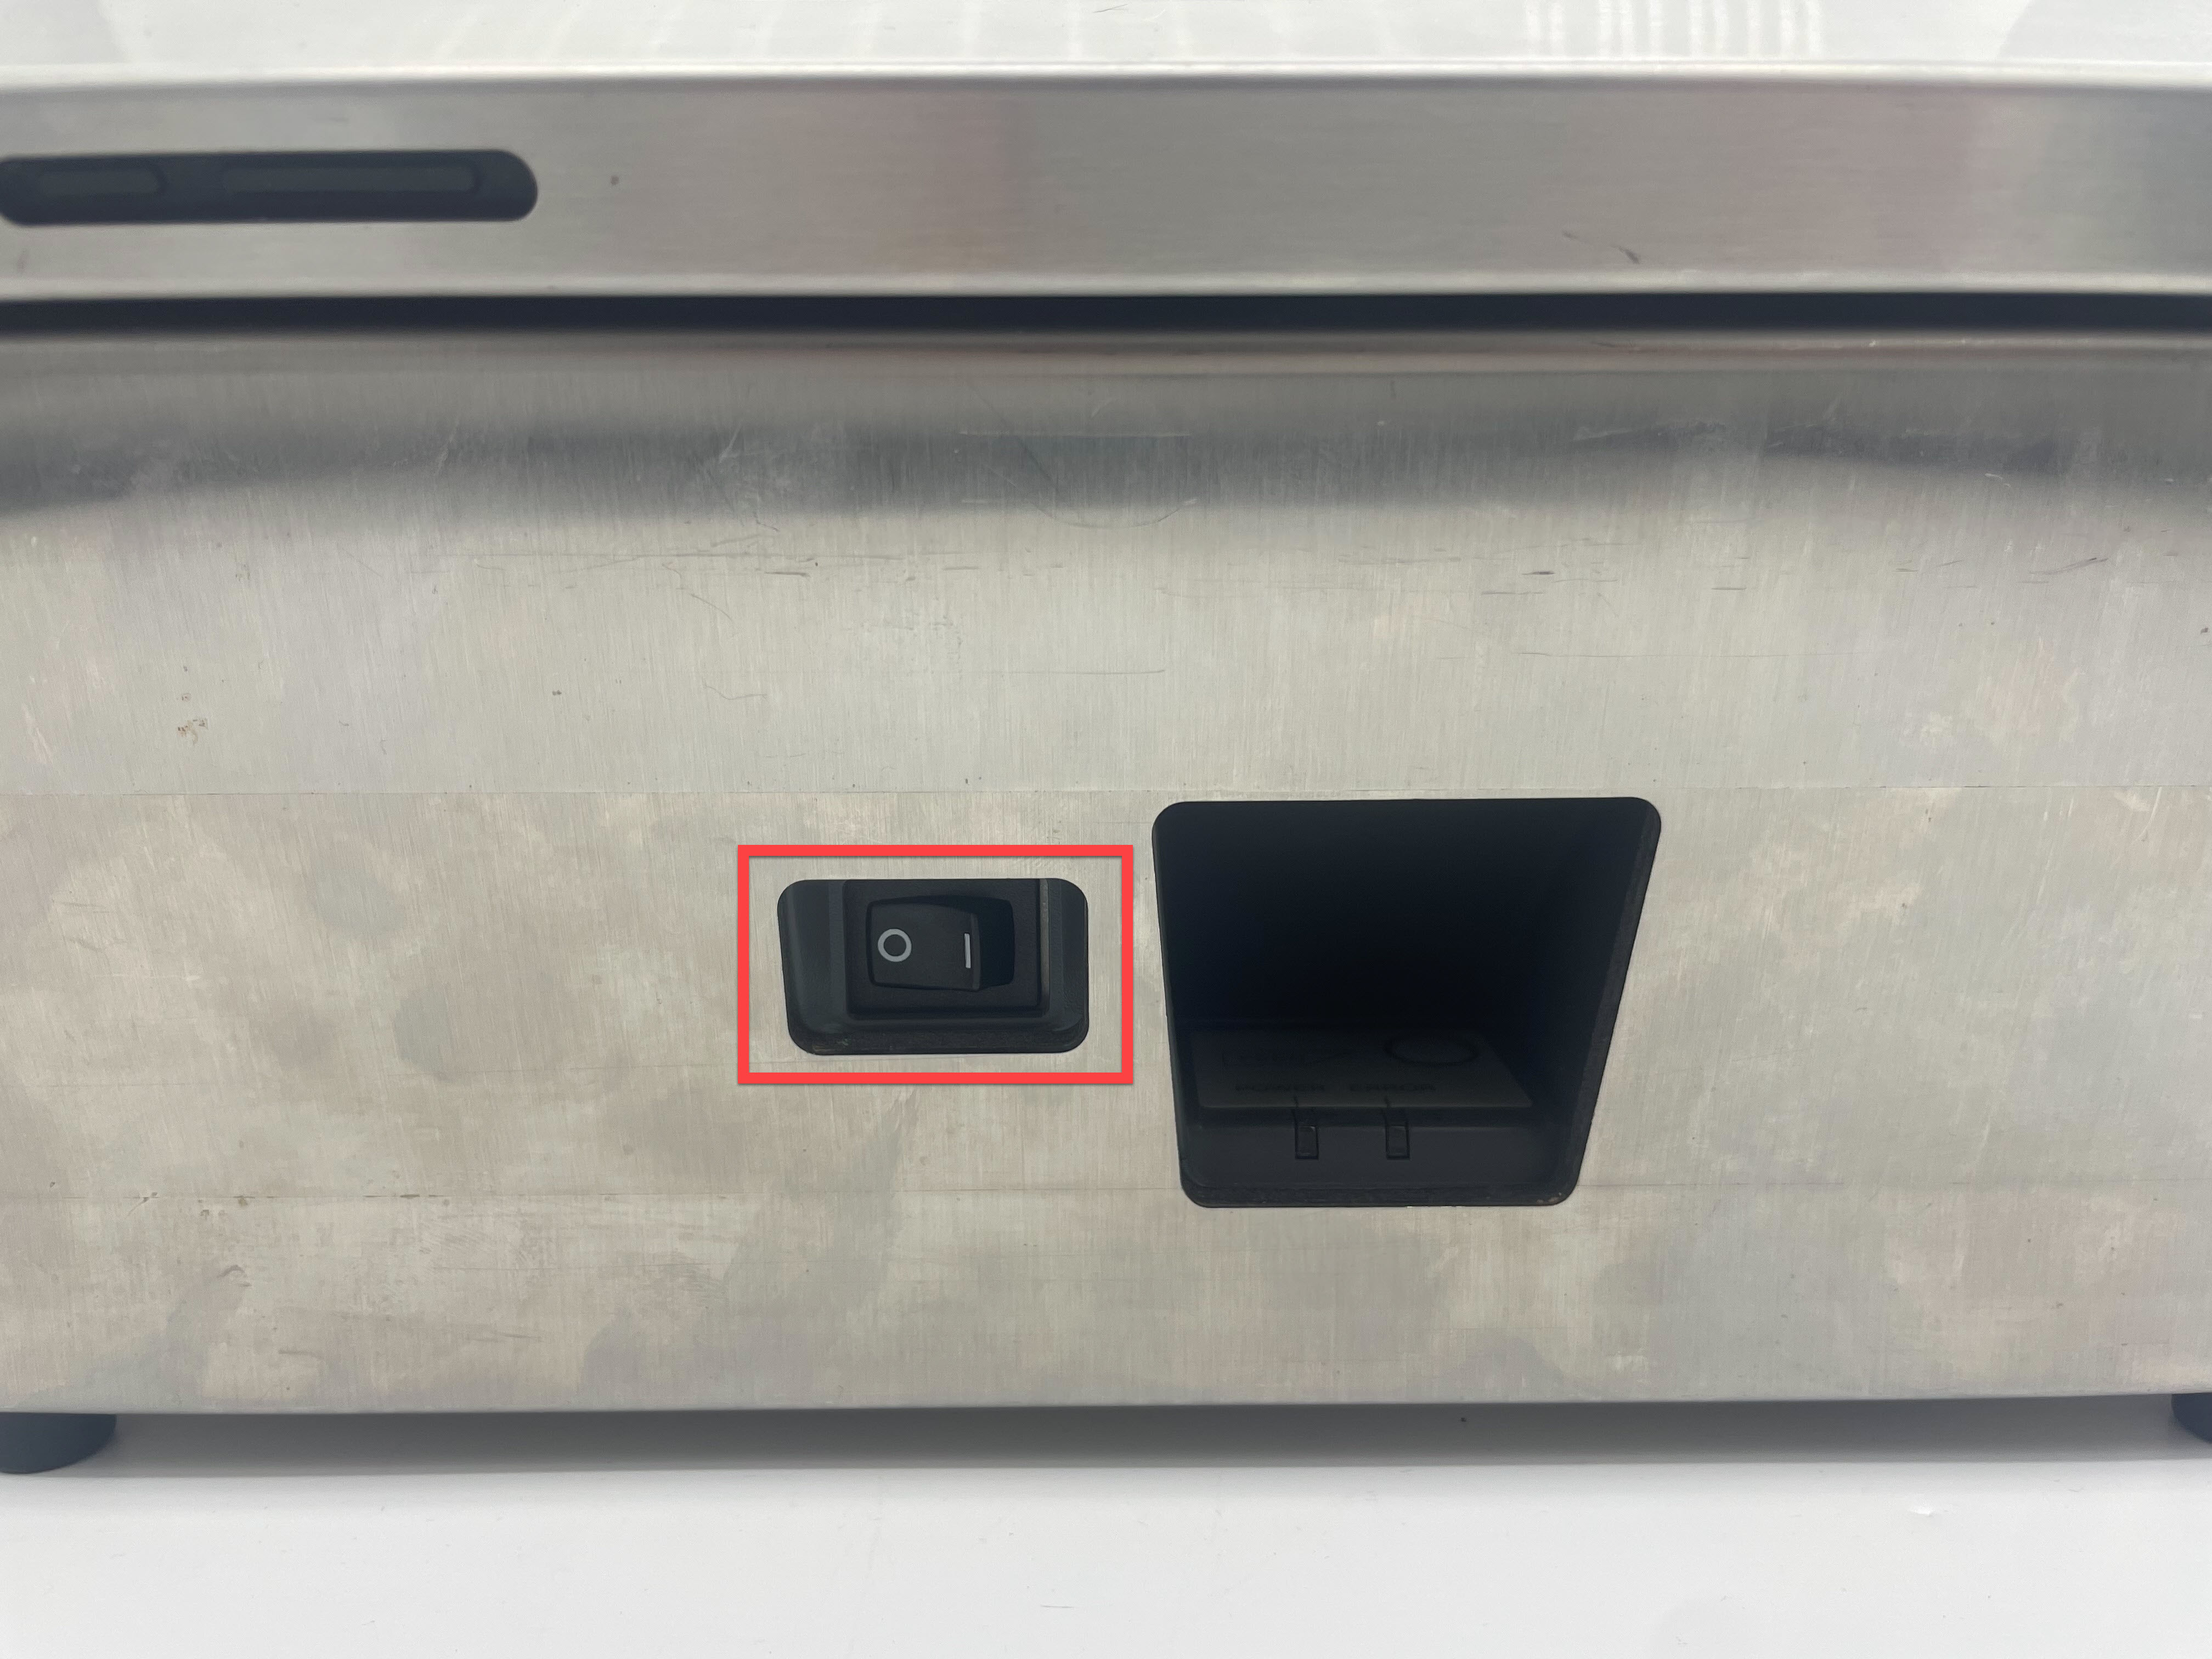
2. Coloque el interruptor de encendido en la parte frontal de la impresora en la posición O.
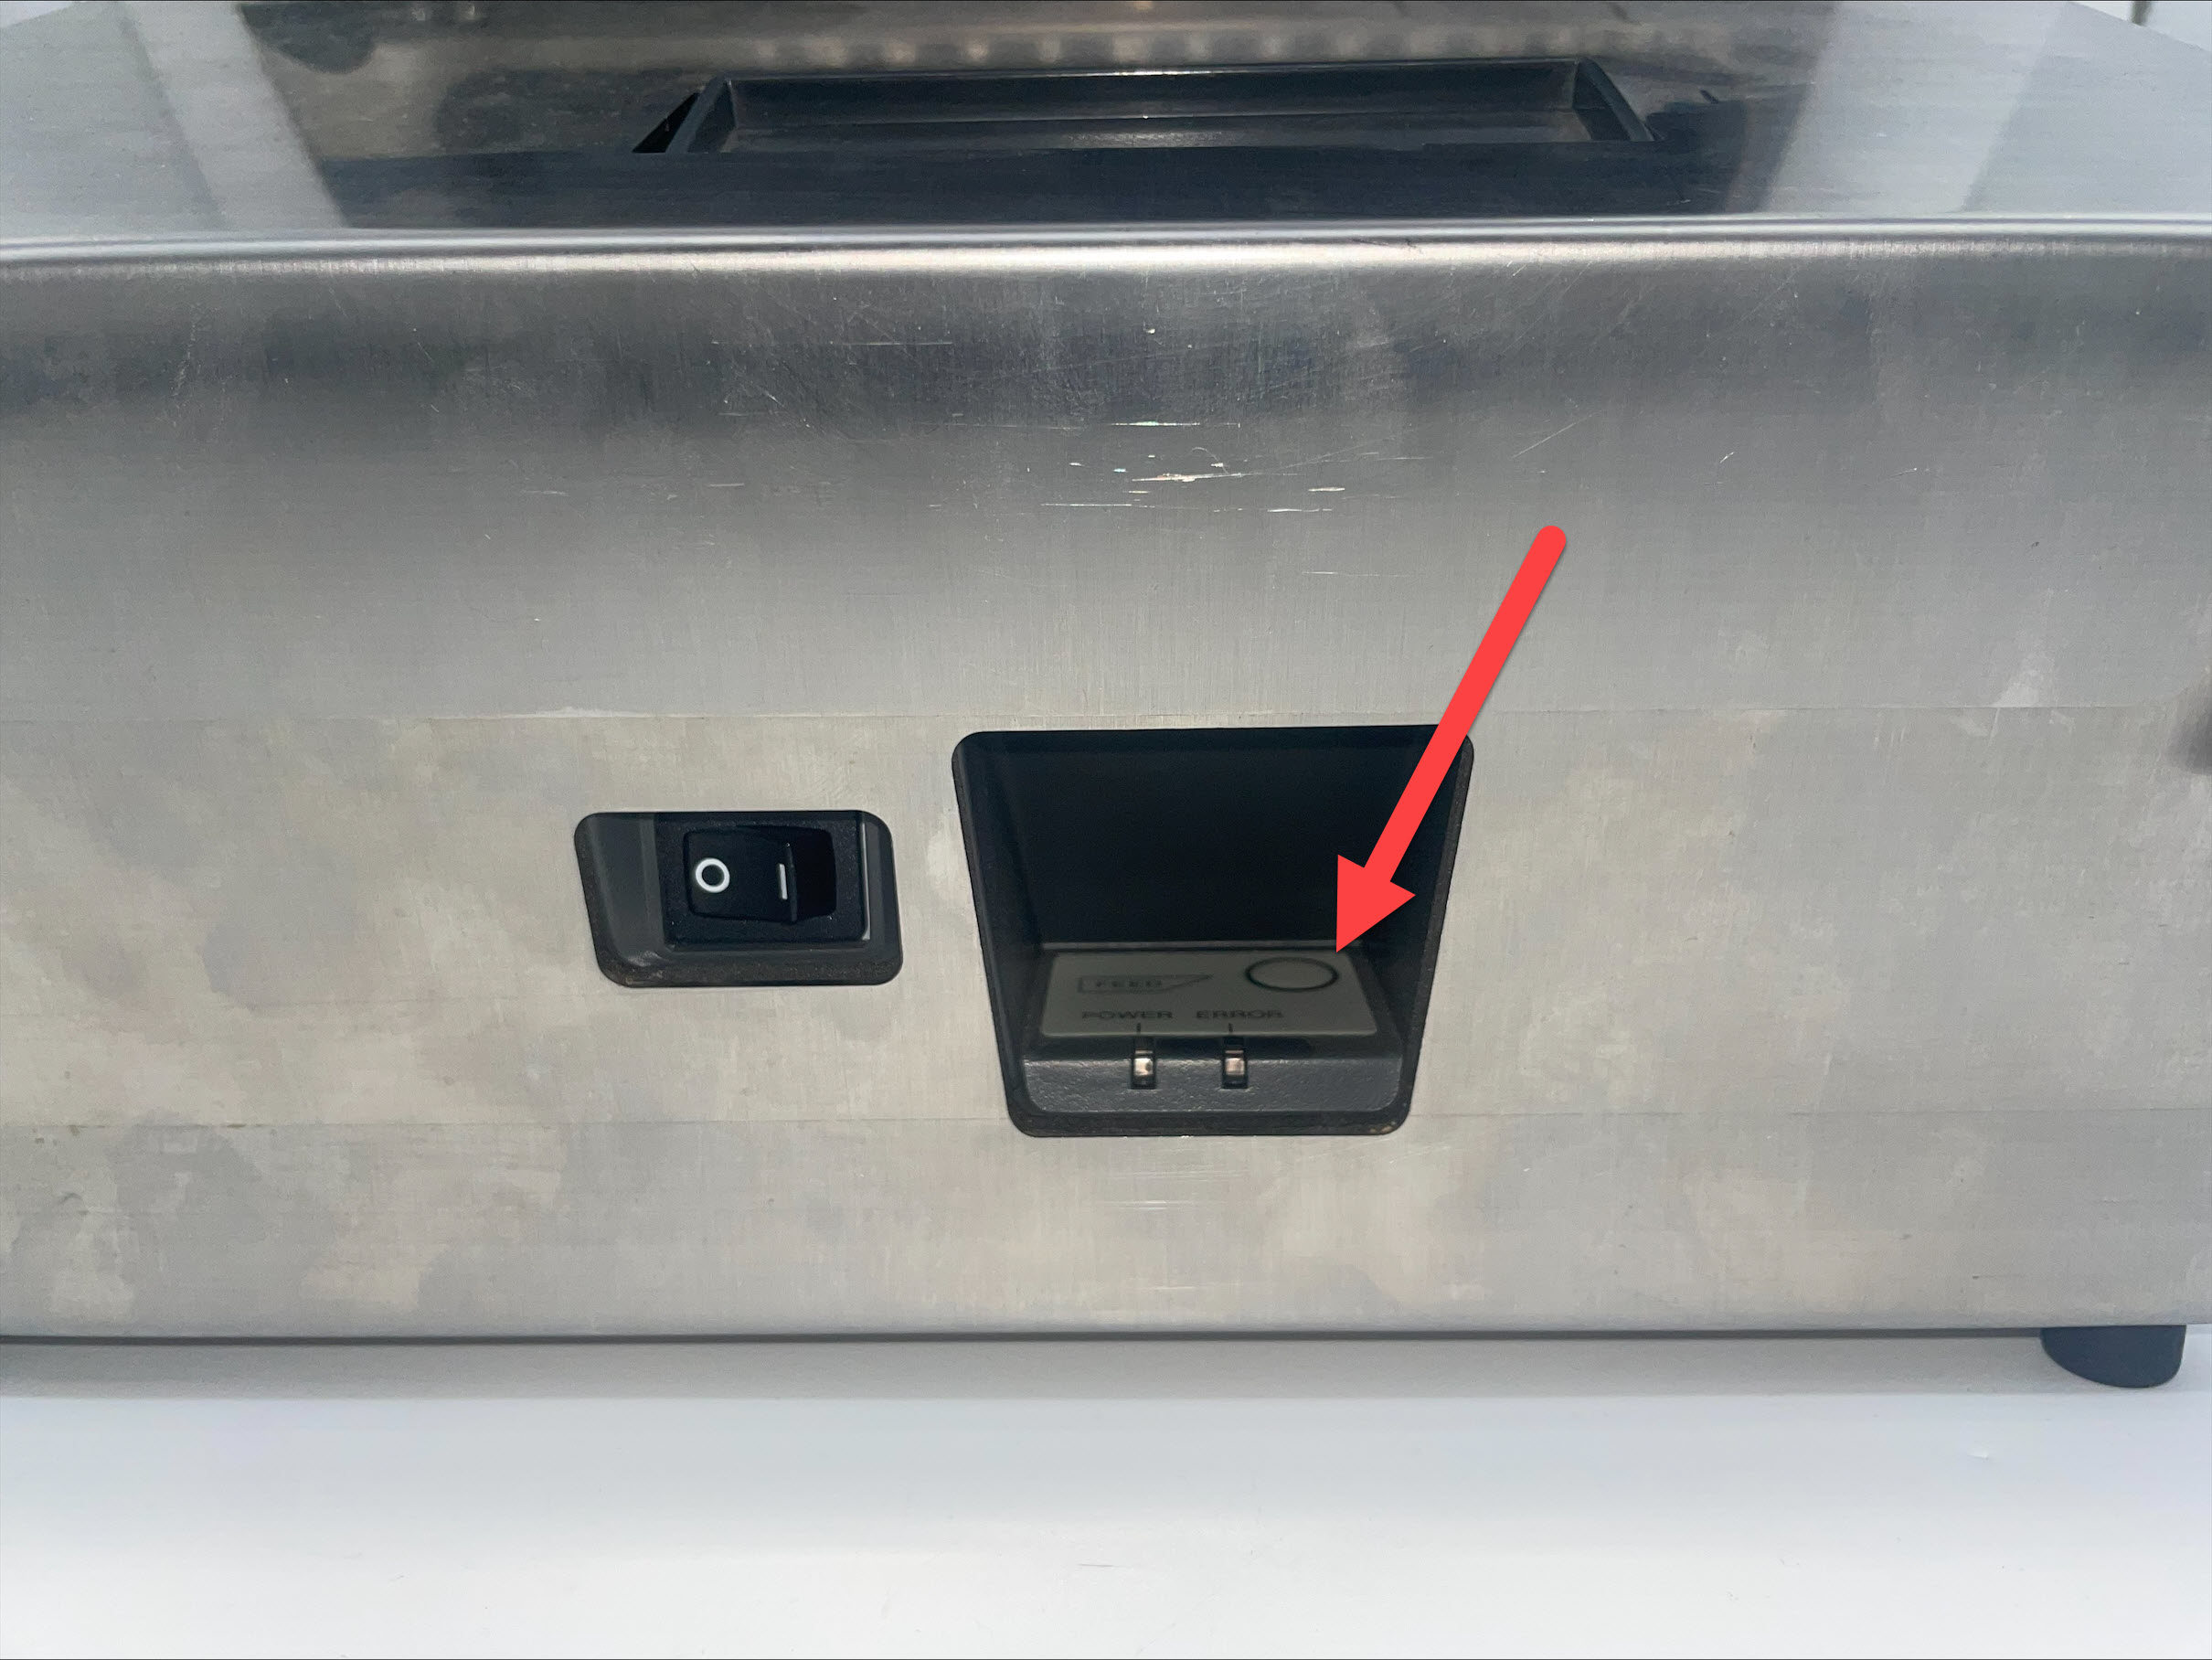
3. Mantenga presionado el botón FEED ubicado dentro de la abertura.
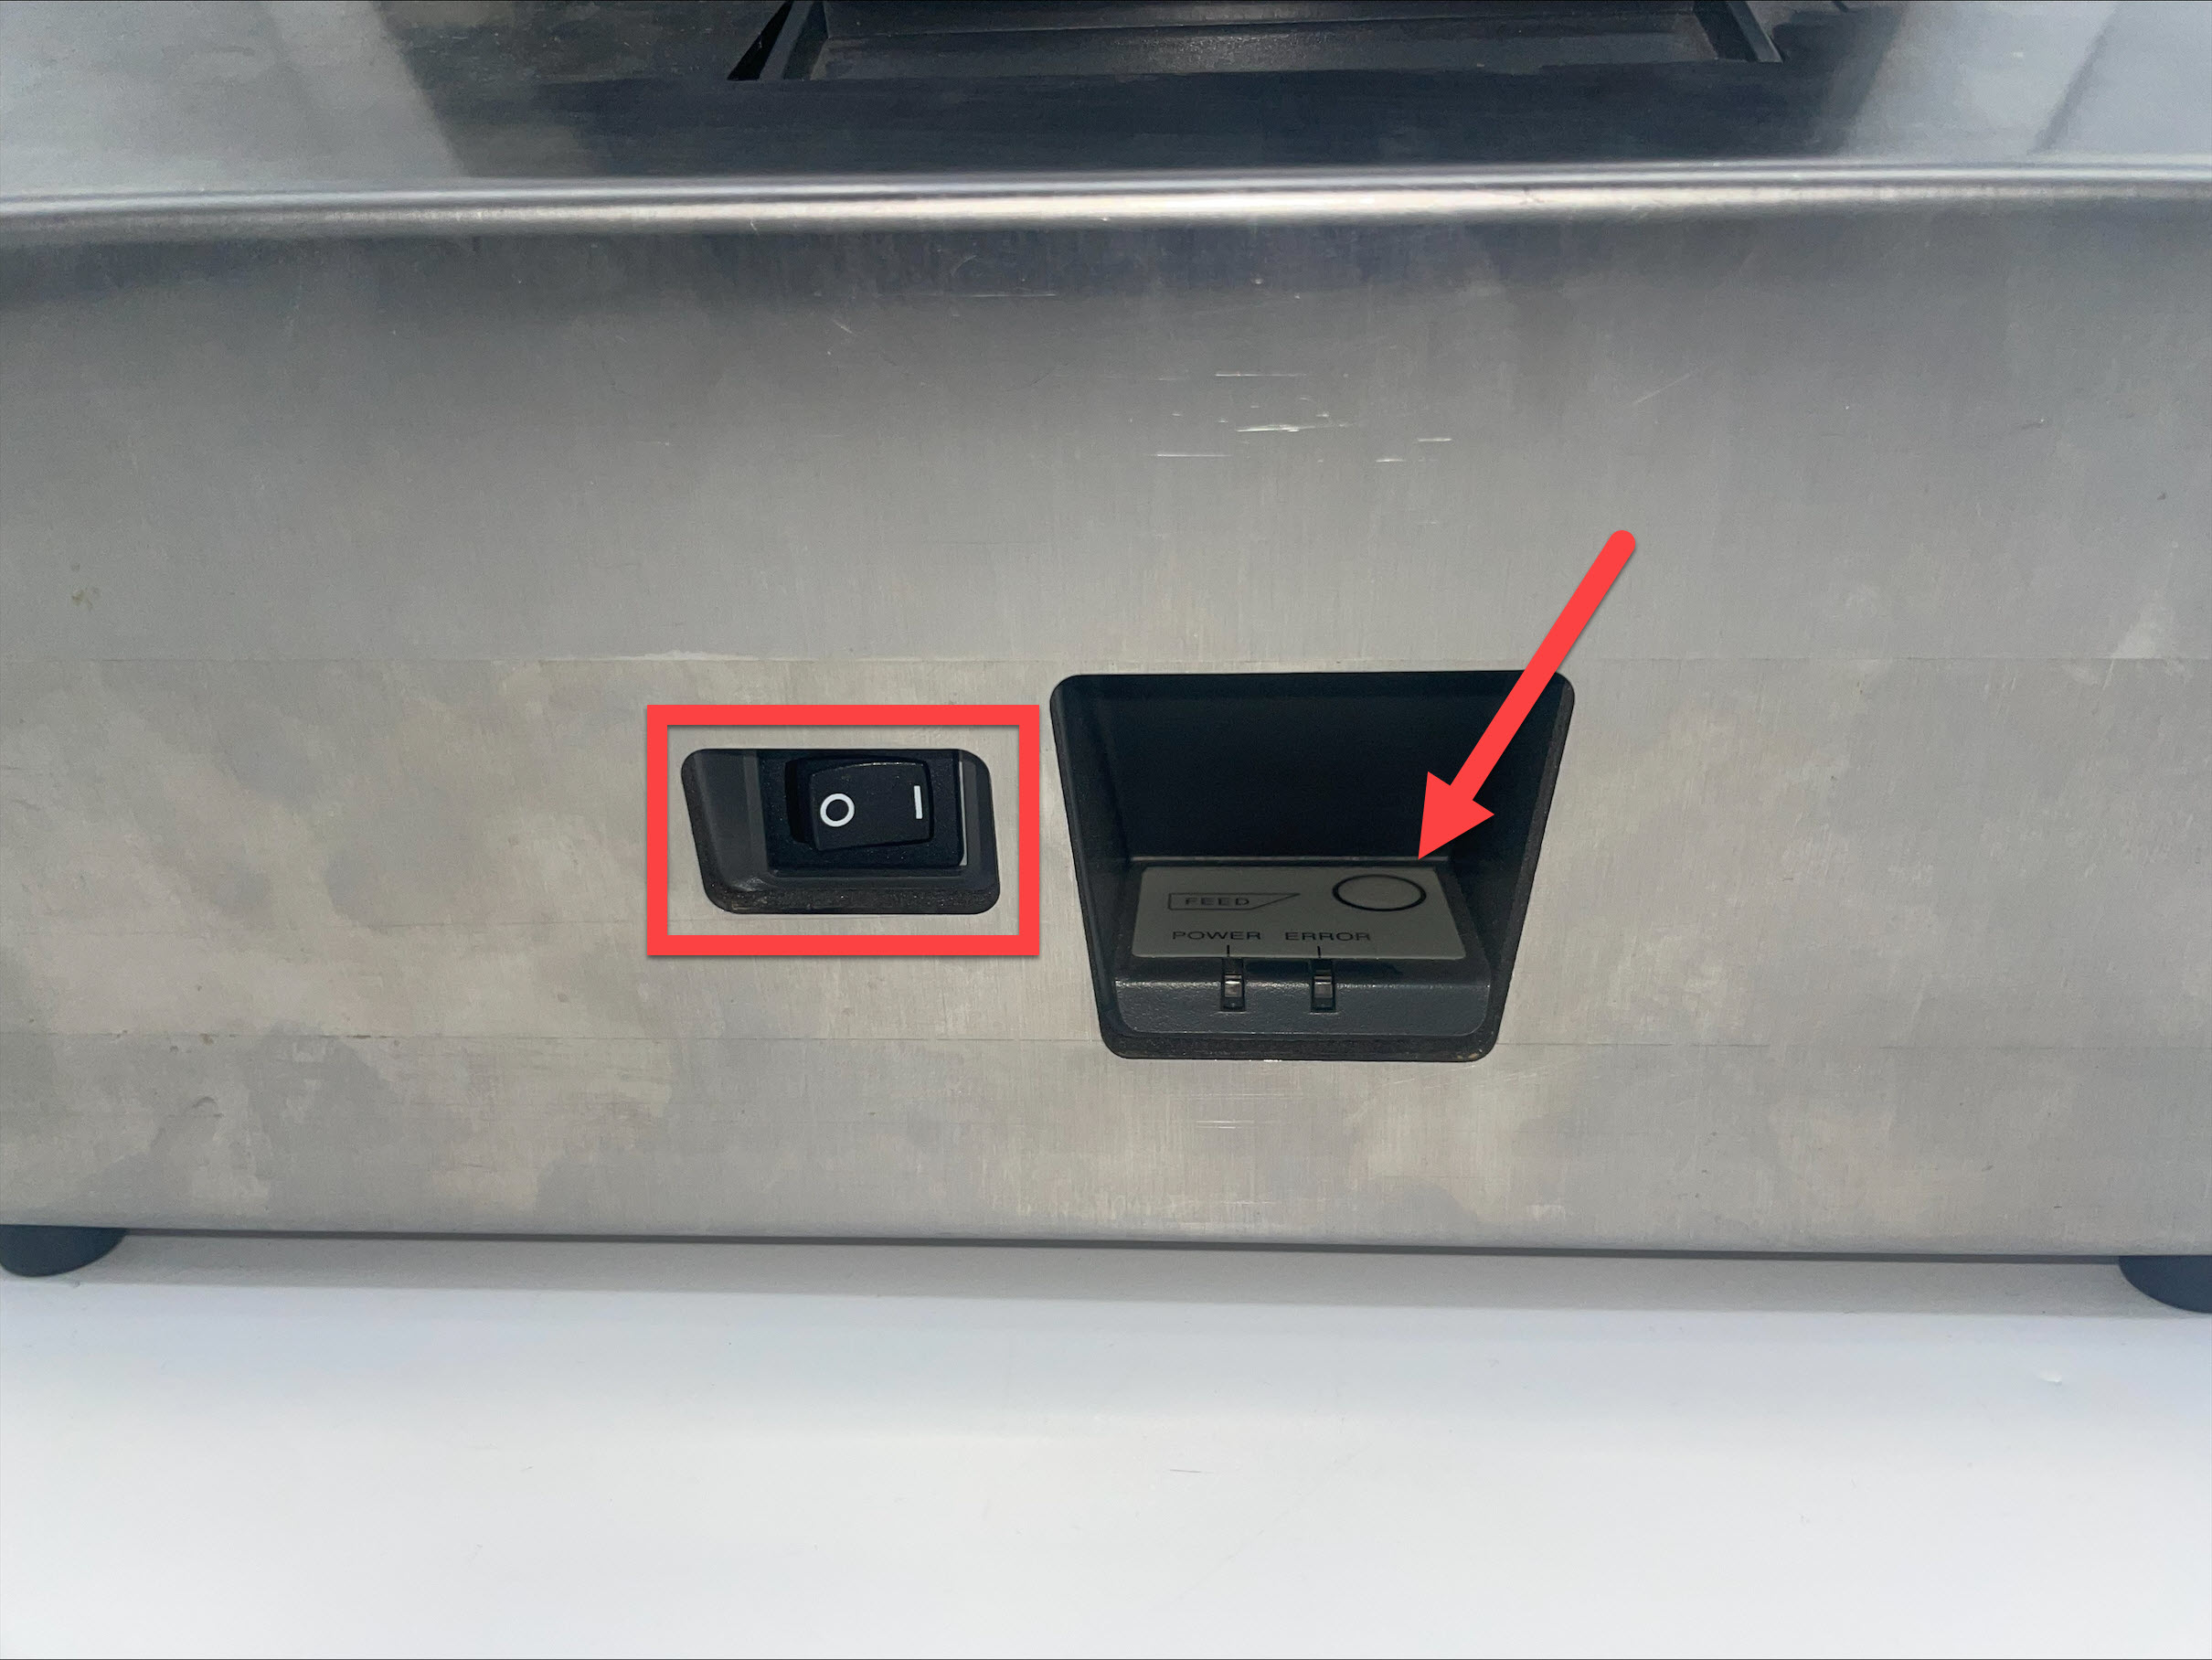
4. Coloque el interruptor de encendido en la posición I mientras continúa manteniendo presionado el botón FEED. La impresora avanzará las etiquetas y las cortará en la ubicación correcta.
Verifique que la línea negra en el reverso de las etiquetas sea sólida y no esté descolorida. Consulte las etiquetas DateCodeGenie como referencia.
Si la línea negra es incorrecta, reemplácela con un rollo de etiquetas con la línea negra correcta e intente imprimir nuevamente.
Calibrar la impresora
Calibración de impresora (Serie X)
La calibración de la impresora DateCodeGenie® puede resultar útil si la impresora no corta o no hace avanzar las etiquetas correctamente. Este artículo explica cómo calibrar la impresora de la serie X (X2, X22, X23).
Pasos:
1. Compruebe que el rollo de etiquetas esté cargado con las etiquetas hacia arriba y con la línea negra hacia abajo. Para obtener más información sobre la carga de etiquetas, consulte Cargar etiquetas en el dispositivo modelo X.
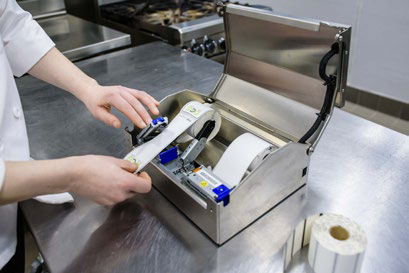
2. Localice los 2 botones rojos o negros en el lado derecho de cada impresora, cerca de la carcasa inferior.
NOTA
Se puede utilizar un lápiz para presionar suavemente los botones de la impresora del lado derecho si no puede alcanzarlos.
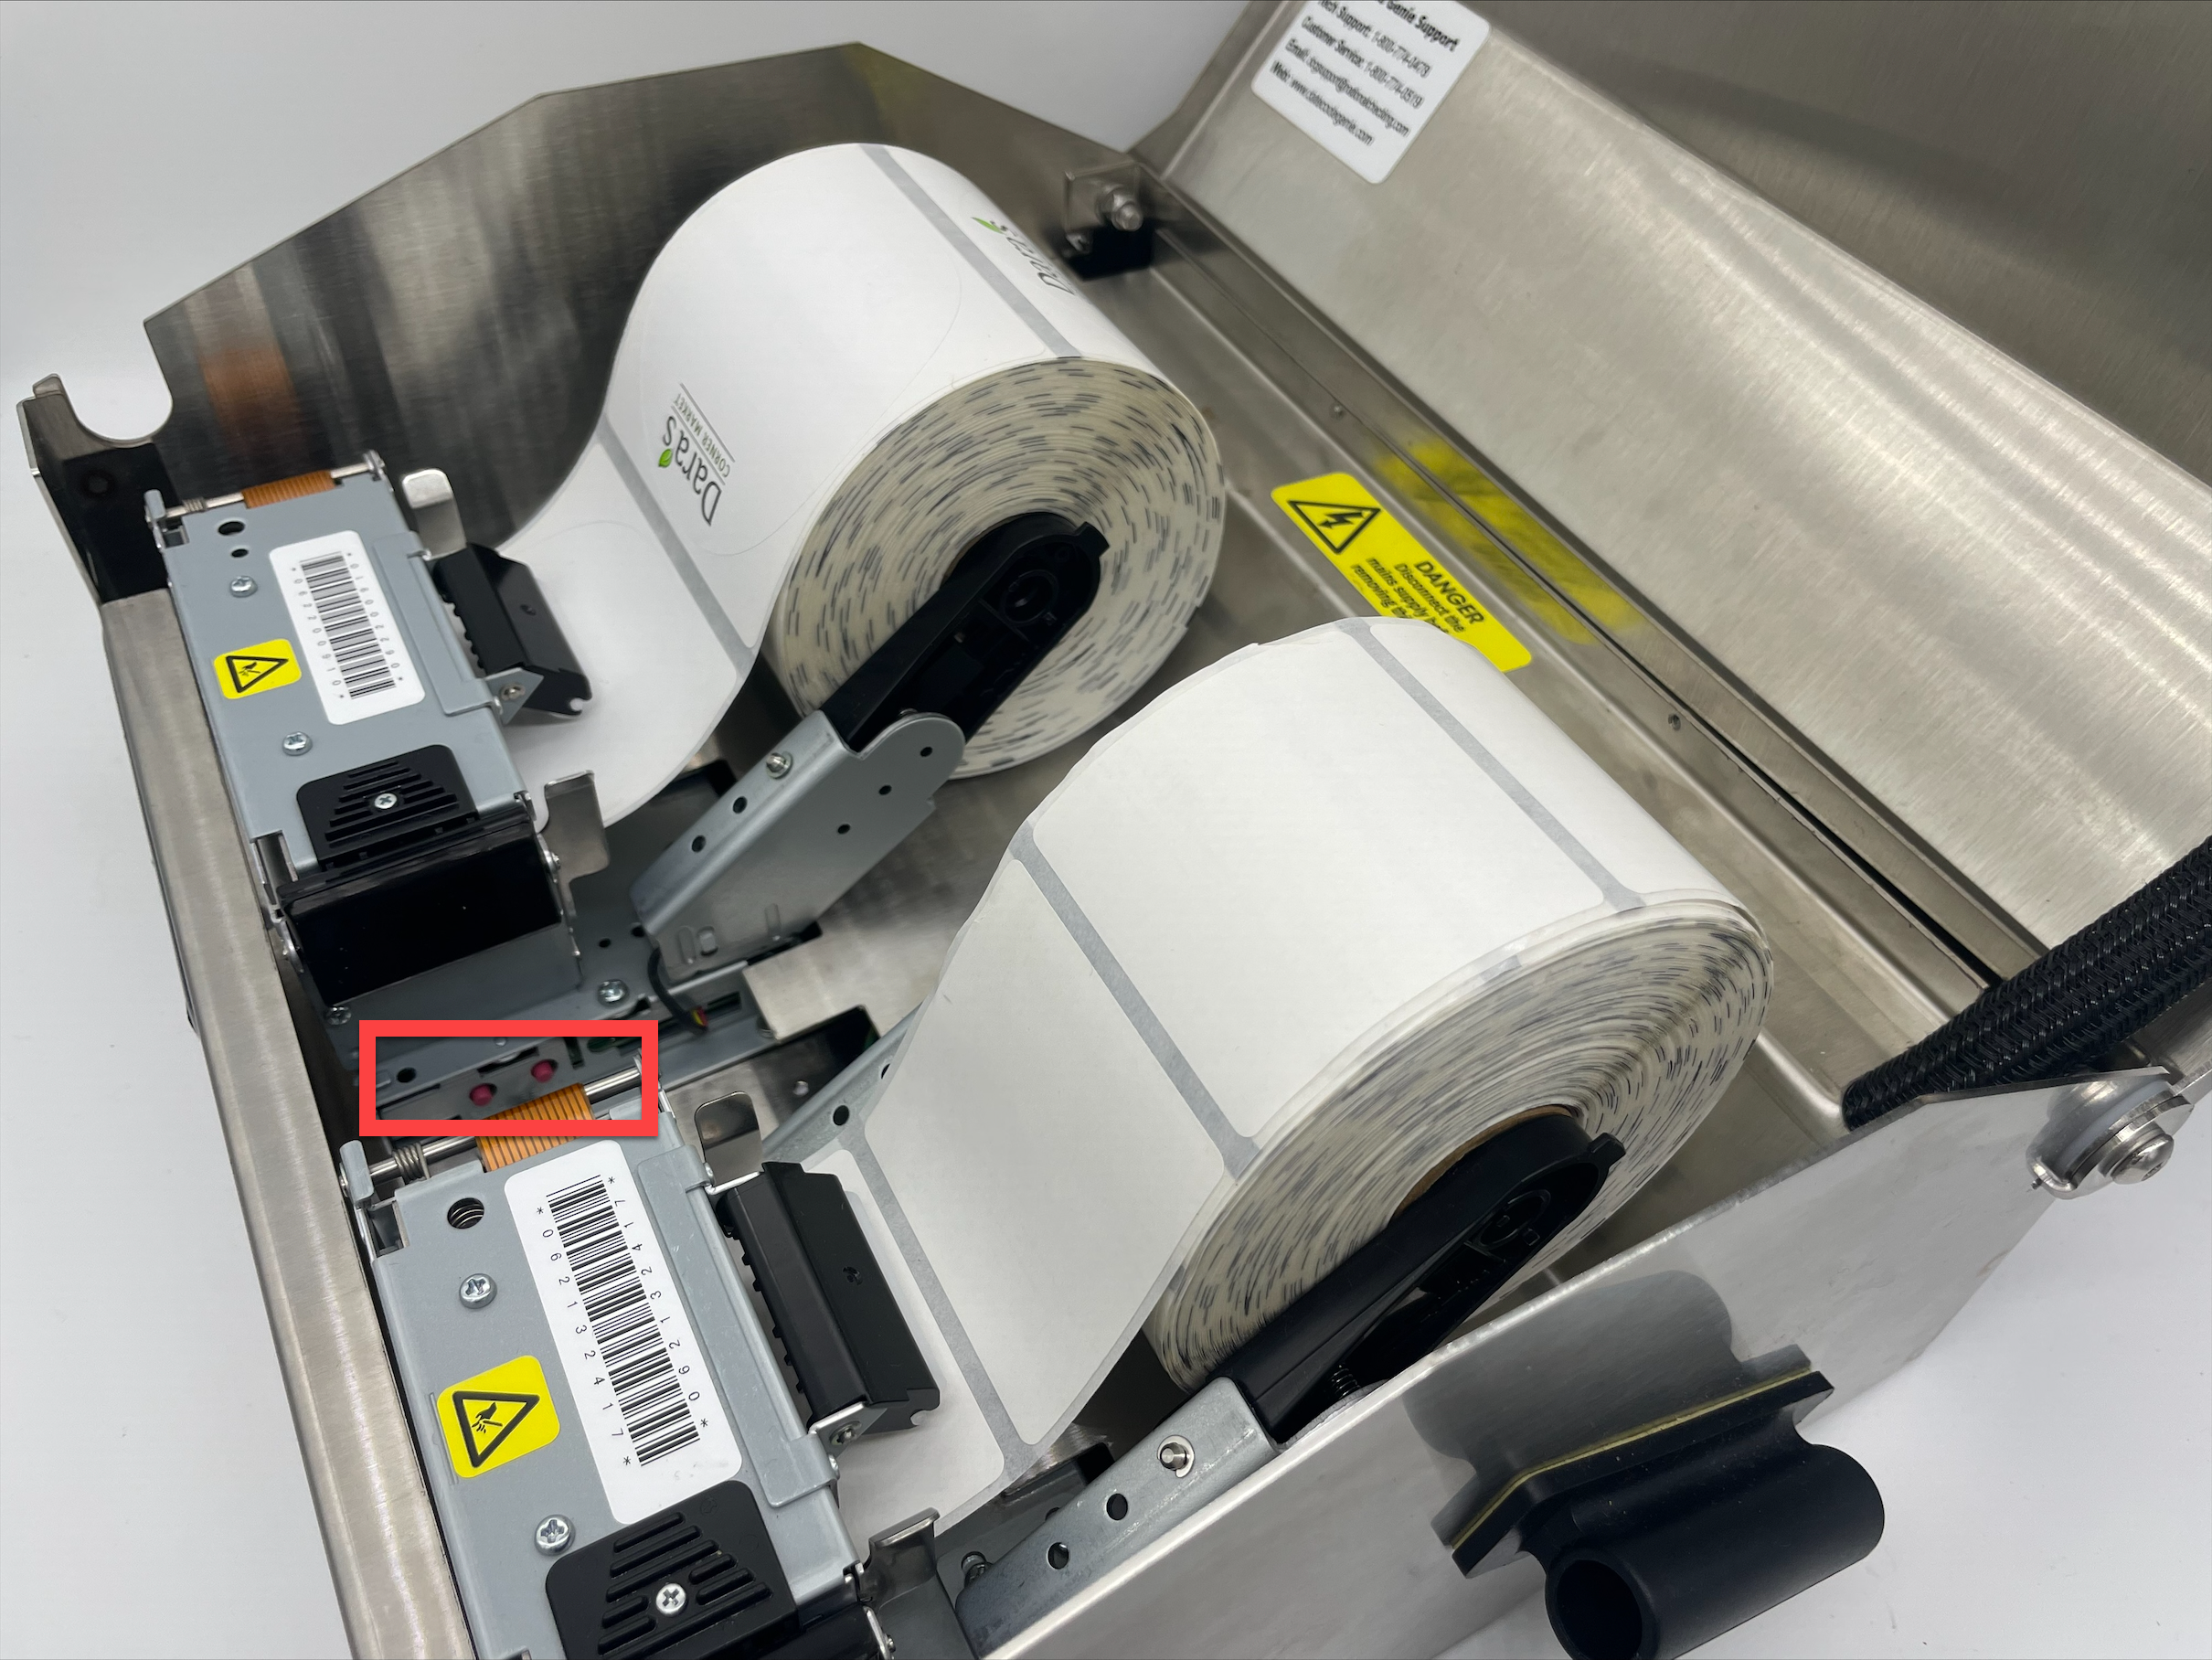
3. Mantenga presionado el botón SELECCIONAR y el botón ATRÁS hasta que las etiquetas avancen, luego suéltelo.
NOTA
Si las etiquetas se introducen continuamente y no se detienen, reemplácelas con un rollo nuevo que tenga una línea negra continua en la parte posterior. Para obtener más información sobre las etiquetas correctas e incorrectas, consulte Etiquetas DateCodeGenie® .
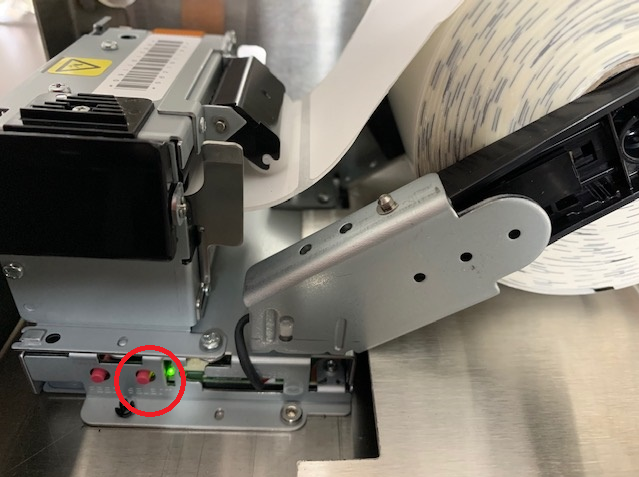
4. Pulse el botón FEED y el botón FRONT. Las etiquetas avanzarán hasta la línea negra y se cortarán.
NOTA
Si la impresora no corta en una línea negra, repita este paso.
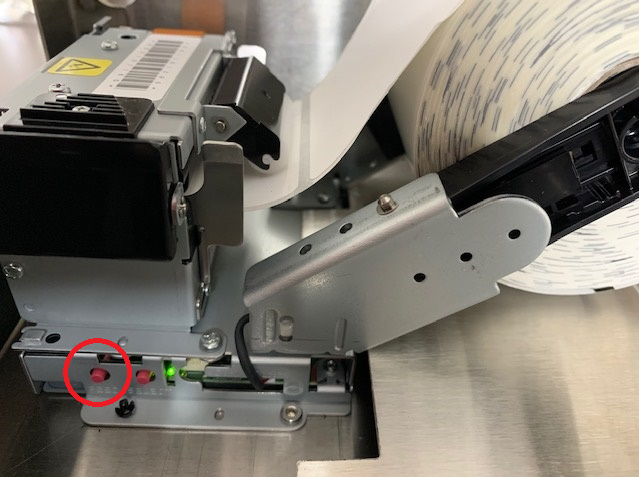
5. Repita estos pasos para cada impresora.
Errores de sensibilidad fallidos: los errores de sensibilidad fallidos que ocurren durante la calibración de la impresora pueden deberse a tres cosas:
1. Líneas faltantes o descoloridas en la etiqueta
Compruebe que haya una línea negra continua en la parte posterior de la etiqueta. Para ver las etiquetas incorrectas, consulte la tabla en Etiquetas DateCodeGenie® .
2. Residuos que bloquean el sensor de línea negra
Limpie el sensor de línea negra y el cabezal térmico de la impresora. Consulte Colocación, mantenimiento y limpieza del dispositivo .
3. Daños por líquidos
Compruebe si hay daños por líquidos. Consulte Dónde se encuentran las etiquetas de detección de líquidos .
Imprima una prueba de impresión
Etiquetas de impresión de prueba (Serie X)
Esta solución de problemas muestra que la impresora está funcionando correctamente y puede avanzar, imprimir una imagen y cortar etiquetas correctamente.
Pasos:
1. Apague la impresora usando el interruptor principal en la parte posterior de la carcasa.
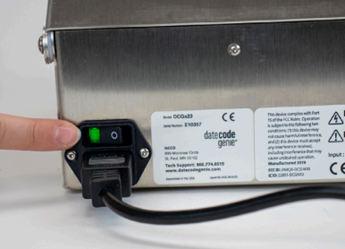
2. Mientras mantiene presionado el botón ALIMENTACIÓN , botón frontal de la impresora, encienda la impresora usando el interruptor de alimentación principal.

3. La impresora iniciará la impresión de autoprueba. Una vez que comienza la impresión, se puede soltar el botón FEED .
4. Después de completar la impresión de prueba automática, la impresora cortará automáticamente y entrará en modo de espera, lista para el siguiente trabajo de impresión.
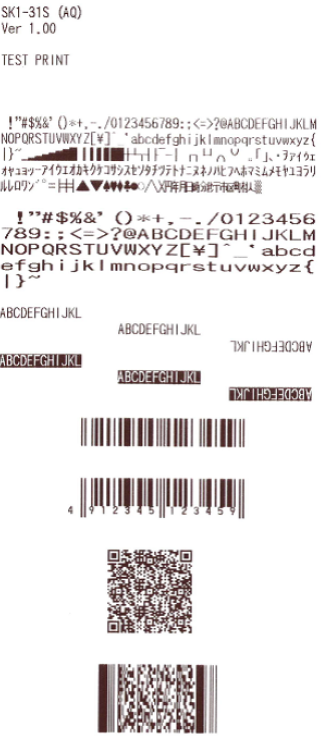
La etiqueta de prueba será similar a esta:
5. Si la impresora corta la etiqueta de prueba por la mitad, presione el botón de alimentación nuevamente.
6. Si la impresora no avanza las etiquetas o corta incorrectamente la etiqueta después de presionar el botón de alimentación, intente el proceso nuevamente.
Verifique que la línea negra en el reverso de las etiquetas sea sólida y no esté descolorida. Consulte las etiquetas DateCodeGenie como referencia.
Si la línea negra es incorrecta, reemplácela con un rollo de etiquetas con la línea negra correcta e intente imprimir nuevamente.
Imprima una prueba de impresión
How to Self Print Test the 2.0 and Fit Model Device
Modelo descontinuado.
DateCodeGenie utiliza una impresora térmica para imprimir etiquetas. Para imprimir y cortar las etiquetas correctamente, la impresora DateCodeGenie lee la línea negra en el reverso de la etiqueta.
Imprimir una autoprueba puede ayudar a determinar si la impresora no está cortando o avanzando las etiquetas correctamente.
Pasos:
1. Verifique que las etiquetas estén insertadas correctamente en la impresora, consulte Cómo cargar etiquetas en los dispositivos del modelo 2.0 y Fit .

2. Coloque el interruptor de encendido en la parte frontal de la impresora en la posición O.

3. Mantenga presionado el botón FEED ubicado dentro de la abertura.

4. Coloque el interruptor de encendido en la posición I mientras continúa manteniendo presionado el botón FEED. La impresora avanzará las etiquetas y las cortará en la ubicación correcta.

Verifique que la línea negra en el reverso de las etiquetas sea sólida y no esté descolorida. Consulte las etiquetas DateCodeGenie como referencia.
Si la línea negra es incorrecta, reemplácela con un rollo de etiquetas con la línea negra correcta e intente imprimir nuevamente.
Calibrar la impresora
Calibración de impresora (Lite)
Si las etiquetas no se imprimen, avanzan o cortan correctamente, al calibrar la impresora se restablecerá la línea negra y se rasgará para una impresión adecuada.
Hay opciones para calibrar la impresora:
Calibración manual de la impresora
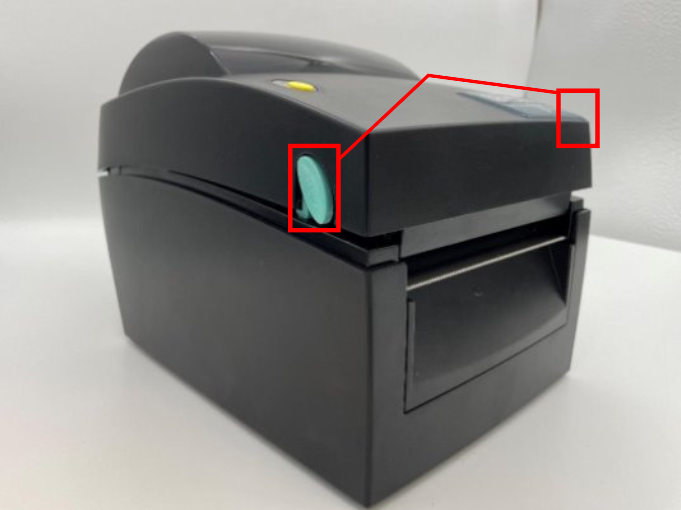
1. Abra la impresora presionando los dos botones de liberación de la impresora azul/verde al mismo tiempo y levantándolos hacia arriba.
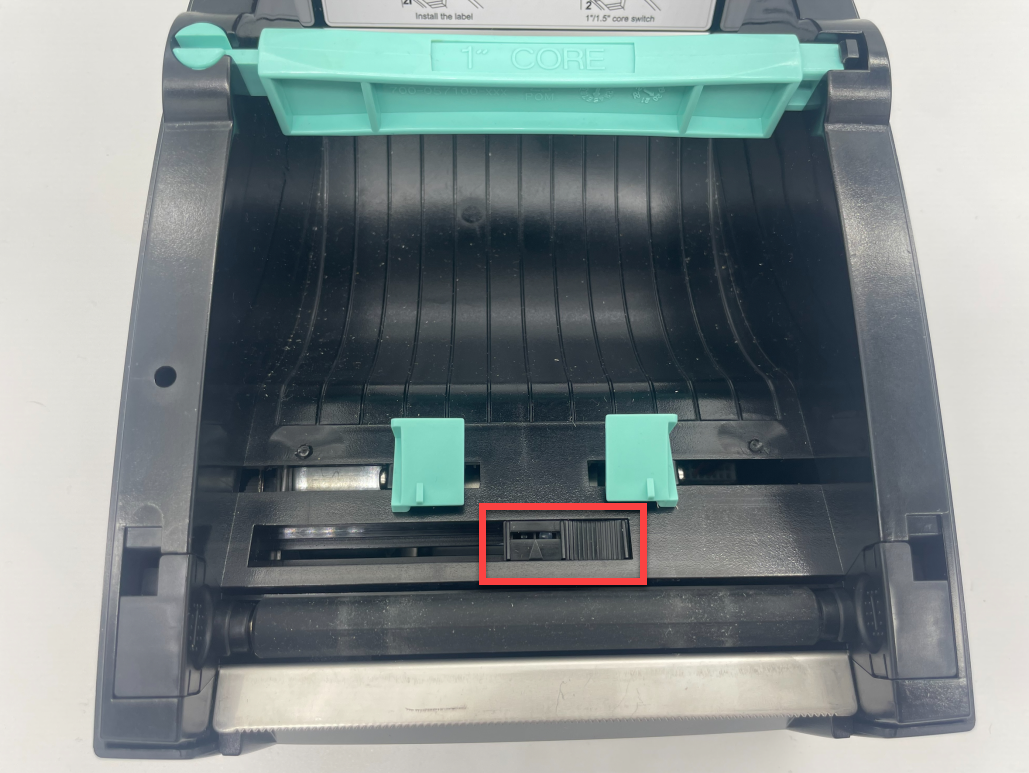
2. Deslice el sensor de línea negra hacia el extremo derecho de la abertura.
3. Pase las etiquetas a través de las guías azul/verde y extiéndalas sobre el borde de la impresora. Ajuste las guías al ancho de la etiqueta y cierre la tapa de la impresora.
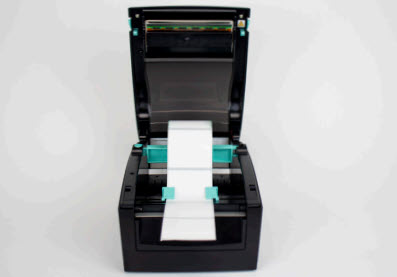
NOTA
¿Necesitas cargar etiquetas? Consulte Cómo cargar etiquetas en el dispositivo modelo Lite .
4. Presione el interruptor de encendido a la posición O para apagar la impresora.
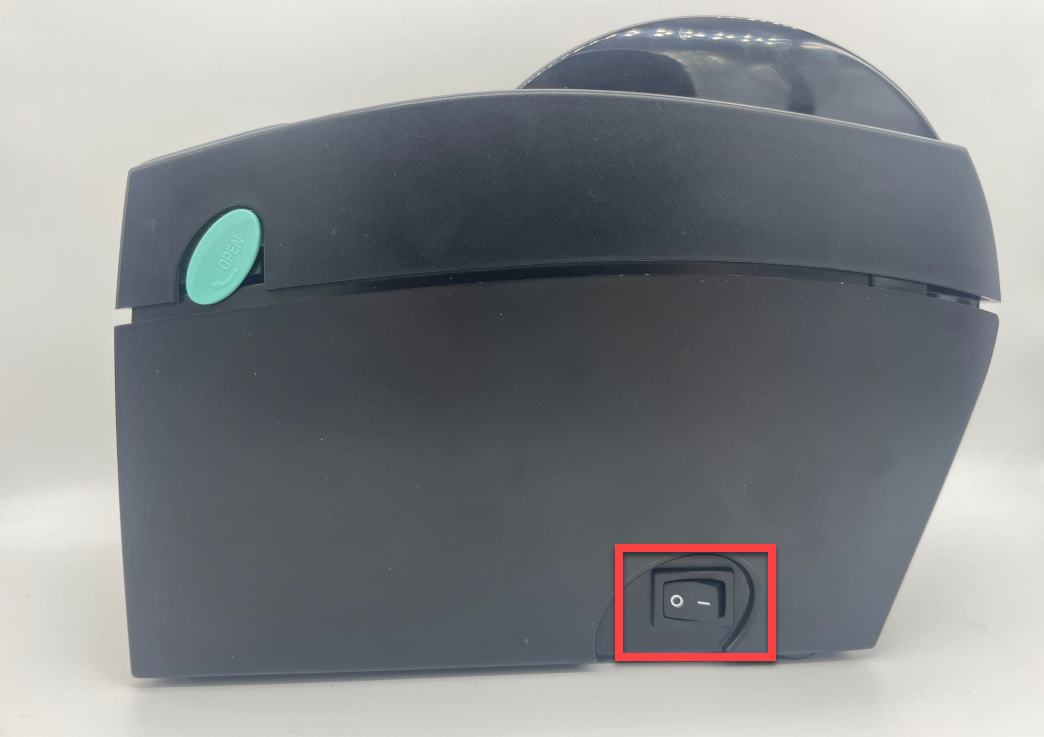
5. Mantenga presionado el botón de alimentación amarillo con una mano mientras vuelve a encender con la otra mano y suelte el botón de alimentación cuando escuche los pitidos y la luz roja parpadee. Se imprimirán etiquetas de autoprueba.
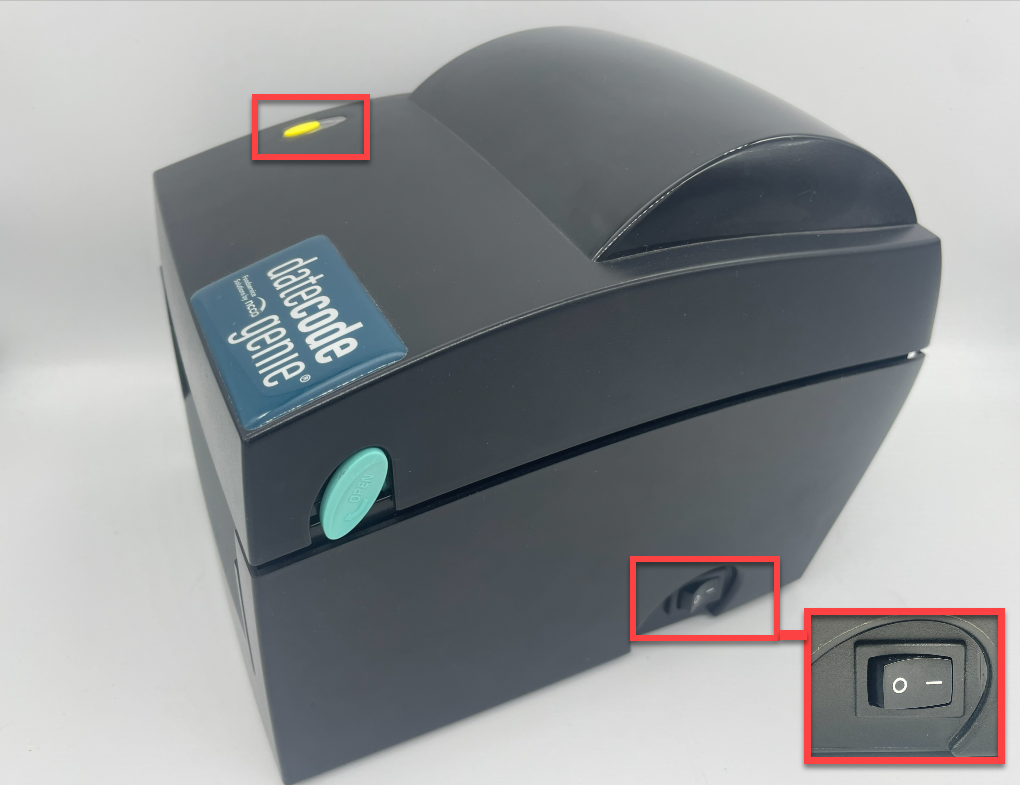
6. Presione el botón de alimentación una vez más para hacer avanzar las etiquetas hasta la línea negra y tire hacia abajo para rasgarlas.
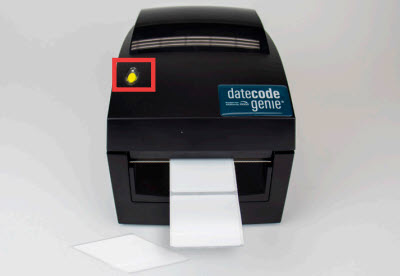
Calibración de impresora de aplicaciones
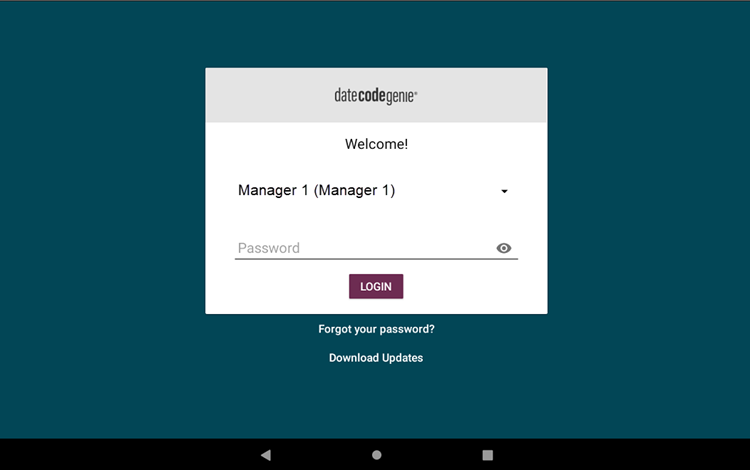
1. Inicie sesión en la aplicación con su nombre de usuario y contraseña, si es necesario.
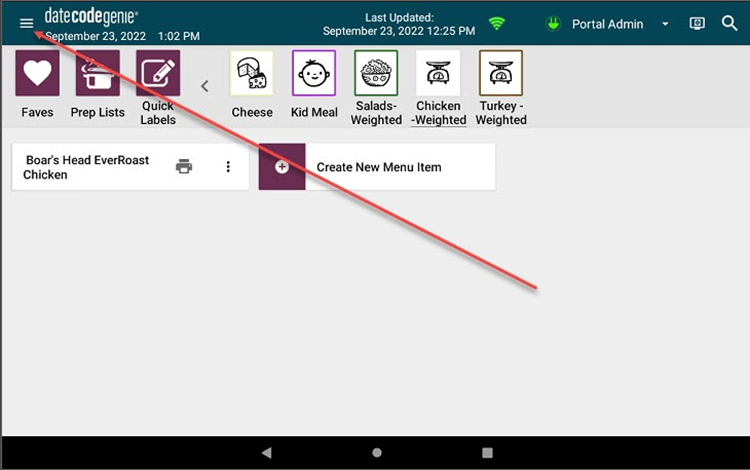
2. Toque el botón de navegación (icono de tres líneas) en la esquina superior izquierda.
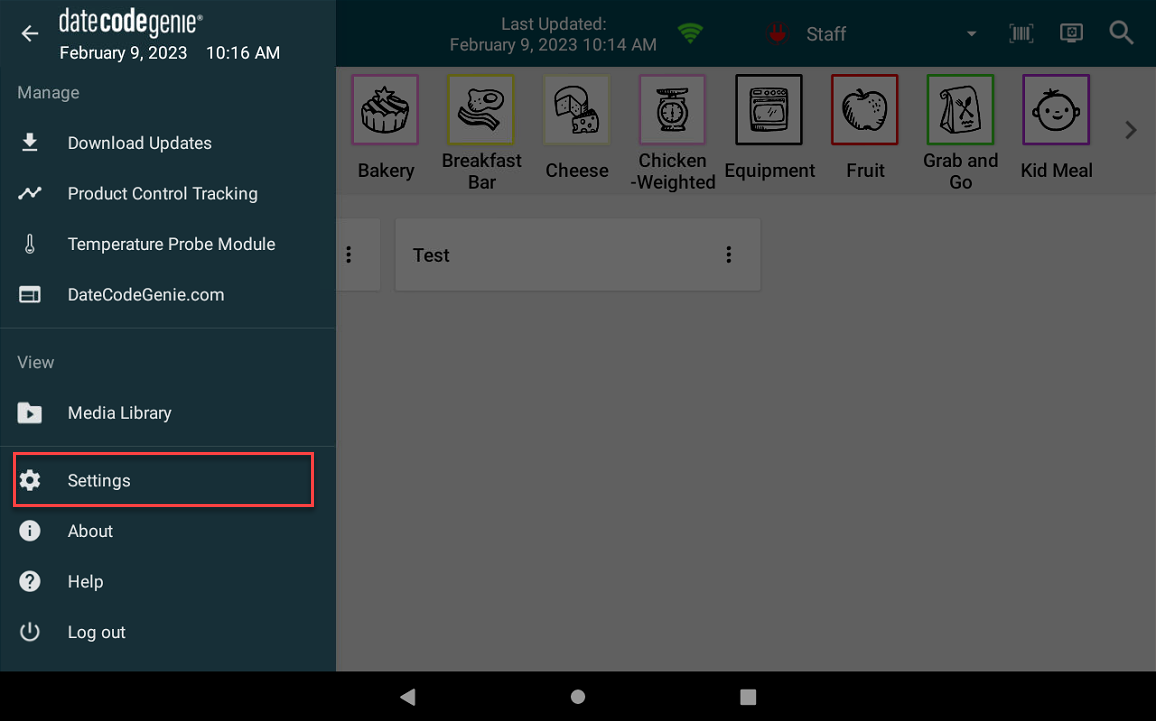
3. Toque Configuración en el menú.
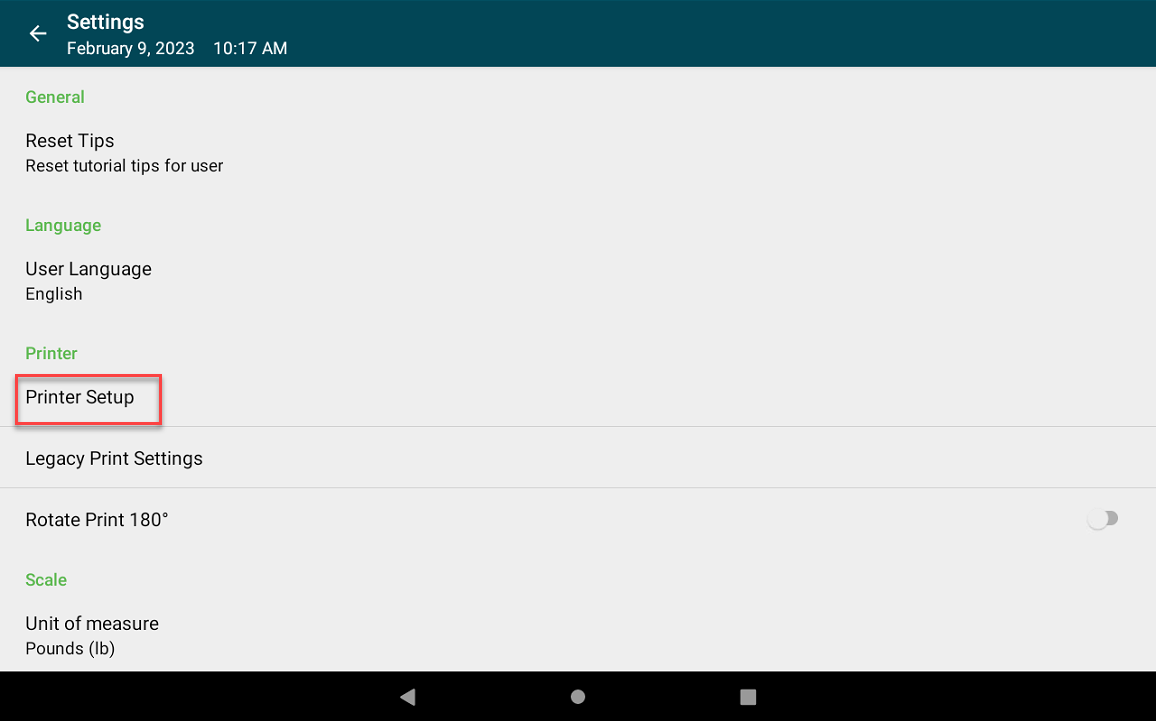
4. Toque Configuración de la impresora.
5. Agregue el tipo de etiqueta si no aparece ninguna.
NOTA
El tipo de etiqueta incorrecto provocará que la impresora no se calibre correctamente.
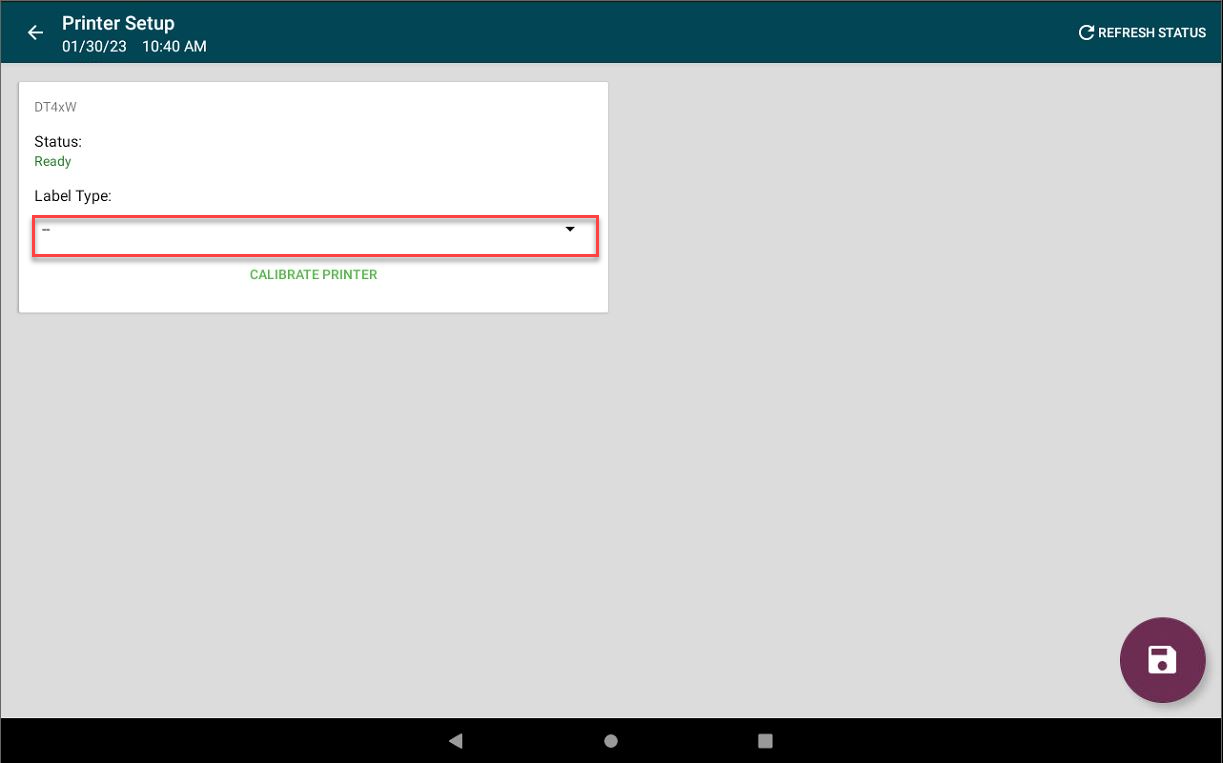
6. Toque Calibrar impresora.
NOTA
El estado debe ser "Listo" para imprimir etiquetas. Si tiene problemas con la conexión de la impresora, consulte Problema de conexión de la impresora (Error 300x1) para el dispositivo Lite .
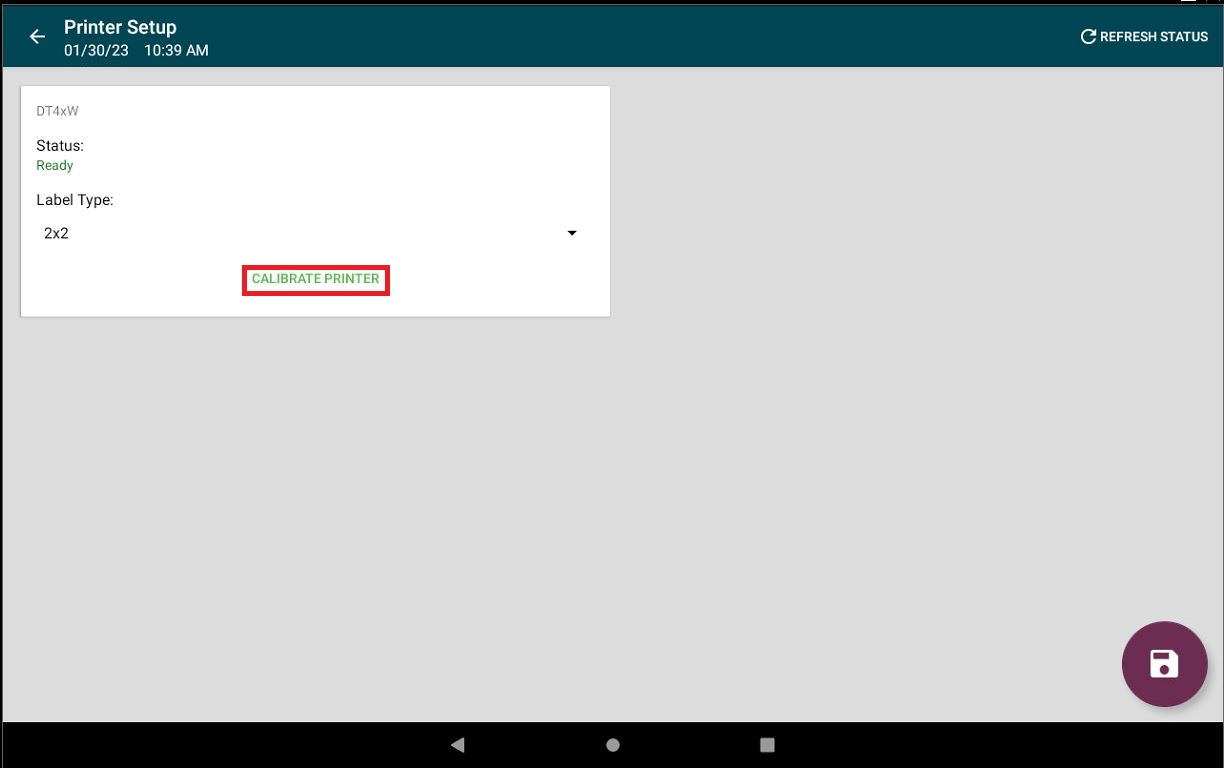
7. Se imprimirá una etiqueta de autoprueba.
Verifique que la línea negra en el reverso de las etiquetas sea sólida y no esté descolorida. Consulte las etiquetas DateCodeGenie como referencia.
Si la línea negra es incorrecta, reemplácela con un rollo de etiquetas con la línea negra correcta e intente imprimir nuevamente.
Imprima una prueba de impresión
Imprimir una autoprueba puede ayudar a determinar si la impresora no está cortando o avanzando las etiquetas correctamente.
1. Abra la tapa de la impresora.
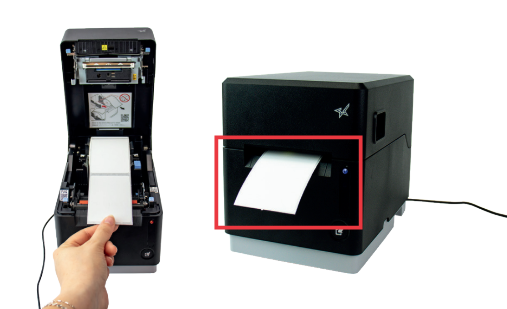
2. Empuje suavemente el rollo de etiquetas en las guías para insertar los ejes a cada lado del rollo y encajarlo en su lugar. Extienda las etiquetas por el borde de la impresora y cierre la tapa.
NOTA
¿Necesita cargar etiquetas? Consulte "Cargar etiquetas" en la impresora mC-Label3 .
3. Apague la impresora presionando y manteniendo presionado el botón de encendido ubicado en el costado de la impresora durante aproximadamente 2 segundos y suéltelo hasta que la pantalla LED de encendido se vuelva negra.

4. Mientras mantiene pulsado el botón de alimentación (la flecha apunta al icono del recuadro), pulse y suelte el botón de encendido de la impresora. Suelte el botón de alimentación cuando comience la autoimpresión.

5. Una vez finalizada la impresión, retire la etiqueta de información de red y Bluetooth que se imprimió.


